Showing posts with label pinterest. Show all posts

Wednesday, July 9, 2014

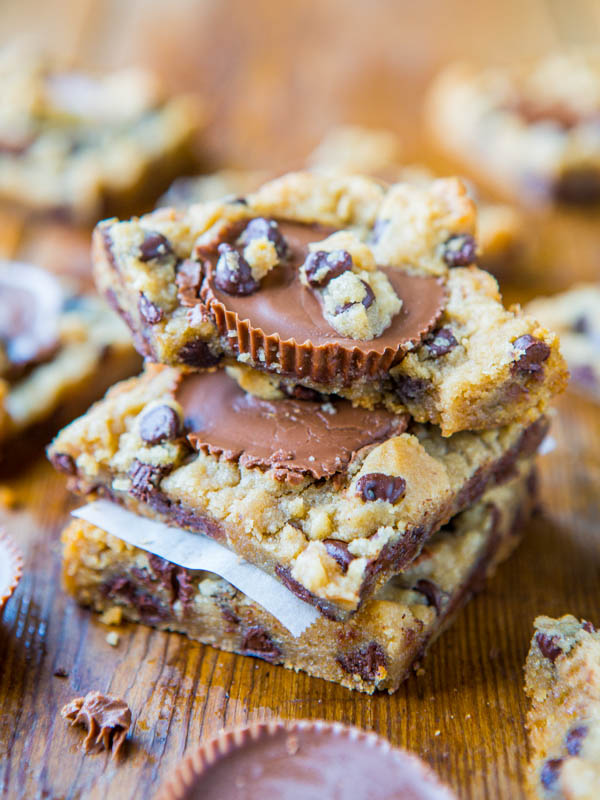
Recipe Review: Peanut Butter Cup Chocolate Chip Cookie Bars

First of all, let me just start this post off by saying that this are the most gooey delicious cookies I've ever made. Probably even better than these. And, what makes them so great? Besides being amazing, of course... They are the so simple to make! Two ingredients. Yes, you read that right, two ingredients!

I found this recipe on Pinterest one night, and knew I just had to try it. This recipe is from Averie at Averie Cooks has instantly become a favorite around here.


I'm not going to go into details about how to make these delicious cookies, but you can check out Averie's step-by-step here. Just trust me when I say that you'll never need to know another cookie recipe again! People will seriously beg you to make these for your next get-together. And, you can keep the fact that they are so easy to make as your little secret. I promise I won't tell!

Oh, and by the way, we used regular cookie dough instead of gluten free, and they came out fine. Here's what ours looked like:


Not as good as Averie's picture, but don't let that fool you! They were still the best cookies to have come out of my kitchen oven - hands down!

I've made these cookie bars twice now, and both times they've turned out great. The hardest part? Waiting for the cookies to cool so that you can cut into them. But, if I'm being honest, we only wait maybe 5 minutes. We don't mind if the cookie is still ooey gooey and falling apart. Just means we grab a bowl, add a couple scoops of ice cream, and eat it all with a spoon. Yum!

I bet you're craving cookies now, huh? What's your favorite type of cookie? Normally I'm a sugar cookie kinda girl, but I think these may have officially converted me to the world of chocolate chips and peanut butter.

Friday, June 27, 2014

Simple DIY Wedding Centerpieces

One of the most popular posts on this blog is the one where I share pictures from our wedding reception. Thanks to Pinterest our centerpieces have become a huge hit on the blog!


The best part? They are super simple to make. And really cheap too!

Here's where we bought everything:
  • Vases (short & medium) - Dollar store
  • Vases (tall) - my mom had in storage
  • Mirror tiles - my mom had in storage too
  • Black rocks/pebbles - Michaels
  • Silk hydrangeas - Michaels
  • Floating candles - Dollar store
  • Kissing bells - yard sale (ribbon from Michaels)
  • Water - free from the sink
  • Food coloring - Sacks (a local dented can store)

We had a couple of boxes of neon food coloring in our pantry and played around with the colors. The color chart on the back of the box had suggestions for turquoise, so we used that as our jumping off point.


Before the wedding, we made large batches of the colored water and stored them in old milk jugs. Doing it before hand gave us time to make sure that all of the jugs were a consistent color, and it saved time the day of the wedding putting it all together.

We mixed up our centerpieces so that half the tables had what you see above, and the other half had a lower centerpiece with black sand and votive candles in a bowl. But these were our favorites!

I can't believe how popular this simple centerpiece has become, but I'm happy to see that others appreciate a simple, yet elegant centerpiece. 


One last tip: One of the things that we did prior to the wedding was collect a bunch of boxes - one for each table at the reception. In each box we placed everything that table would need. Rather than having a box of candles and running around to each table, each box had the exact number of candles the table needed. We also attached a photo of what the table should look like for easy reference. As someone who has helped quite a few friends set up their wedding reception, spending the time before the wedding to organize everything saves a lot of time the day of the wedding. 

Thursday, June 26, 2014

Recipe Review: Cinnamon French Toast Bake

Every year, I promise my AP students that I'll provide breakfast for them the morning of their AP exam. It was something that my AP English did for me and my classmates my senior year, and its something that I wanted to pass on to my students. Although my English teacher took us out to a restaurant the morning of our AP exam, I don't have that kind of money (not to mention there isn't a place large enough, or open that early in the morning, where I live now). So I bring breakfast to them.

Normally, the breakfast consists of donuts, fruit, granola bars, juice, and water. But this year, I had twice as many mouths to feed than I did in previous years. So, I was on the hunt for something that could be made on a larger scale, but still relatively cheap.

I found this recipe:


Cinnamon rolls? Icing? French toast? Syrup? Perfect!

I made a total of 4 casseroles the morning of the AP exam. It was pretty simple and straightforward. The only thing I left out of the original recipe was the nuts. I pre-mixed the eggs, vanilla, cream, and cinnamon the night before to save time in the morning. Then, it was just a matter of cutting up the cinnamon rolls and assembling everything.


The kids loved it! Even in their sleepy, just-rolled-out-of-bed state, they had nothing but positive things to say about the casseroles.

I still provided bananas and apples for those students who were "carb conscious," as well as milk, juice, and water bottles. Overall, we only ate 3 out of the 4 casseroles. That was enough for each of the 70 students (yes, 70!) to have one helping. When I realized there wasn't enough for everyone to have seconds, I reserved the last casserole and shared it with the teachers in my building & department. 

This is definitely a recipe I'll use again! I think this might become my AP exam day tradition with my students. If you're looking for something sweet and filling, you will definitely want to try out this recipe.

Tuesday, June 17, 2014

Jar of Summer Fun

Normally during my summer vacations I have a lot of time to myself. However, this year, thanks to Dan's work schedule, we have a lot more time to spend with each other. Should be a great blessing. But sometimes we run out of ideas of what to do together. So we end up spending the day in front of computer and television screens. Not exactly what we envisioned for our summer.

So, I turned to Pinterest for ideas. There were quite a few summer bucket lists out there, but none that fit everything that Dan and I wanted to do. Plus, we weren't exactly wanting a checklist. More a way to come up with an activity when we were feeling bored.

Solution? A jar and cardstock.


I took the ideas that I liked from the bucket lists and wrote them down on pieces of cardstock that I had stored away in a box. Then, I found a jar that was left over from our wedding decor and put all the activity ideas in there. But, before I did, I made sure to ask Dan if he liked the ideas that I put in there, and also asked him if there was anything else he wanted to add.

I put the jar in our dining room so that it was in a central location. Plus, we have to walk by it all day, every day, so it's a constant reminder that if we're bored, we can just pull something out of the jar. The rule is that if we pull it, we have to do it (unless its an outdoor activity and the weather is crappy). And, if it requires a little bit of travel, then we spend time planning the trip for the next day we're both home.


Here's a list of some of the activities we added to our jar:
  • Go to the beach
  • Walk around a local park/square
  • Wash the cars
  • Paper airplane contest
  • Go fly a kite
  • Feed the ducks
  • Stargazing date on the balcony
  • Play a card/board game
  • Go to a local baseball game
  • Have a themed movie marathon using DVDs we already own
  • Make root beer floats
  • Frozen yogurt date
  • Go to a drive-in movie
  • Go to Sea World
  • Create a photo scavenger hunt competition
  • Go bowling
  • Try a new recipe
  • Have a picnic
  • Learn a new cocktail
  • Random act of kindness for a stranger

Does your family make a summer bucket list? How do you organize your list? Any other activities you would add to your list?

Thursday, June 12, 2014

Better Late Than Never

So, as I was writing about the updates in my classroom nearly a year ago, I realized I never shared the "how-to" on my wall map that was painted a couple summers ago. I started writing this post, and was holding onto it thinking that I would save it for the next "Pinterest Challenge," which you can read more about here, here, here, and even here. But, one was never announced, so this post has been sitting in my draft folder for quite some time now, and I figured it was finally time to go ahead and it "Publish." 

I mentioned that I was starting the project, even shared the final product, but never really explained in detail the whole process. Granted, it's a simple process, and I really didn't take many photos along the way, but I still wanted to share in case there was someone else out there who wanted to attempt something similar. 

The first step in the process is to figure out what you want on your wall. I searched Pinterest for a map that had easy lines on it. As much as I love barrier islands, those seemed a little too tedious to paint. I settled on this map. Straight lines. Perfect!

Then, I rummaged through my supply closet and found some transparency films that my mom had salvaged from an old house. I printed the map onto the transparency film. The next task? Finding an overhead projector. Luckily, I knew that the math department had a couple stored away in a closet (perks of being the only social studies teacher in the math building) and said closet was unlocked over the summer.

At this point I bet you know where this is going, huh? Place transparency on projector. Hook up to electricity. Center it on your wall and get it to the desired size. Grab pencil. Trace.


I thought about adding a "You are Here" star on my map, but decided against it. If my students didn't know where Florida was on a map, we had bigger problems to deal with....

Once everything was traced, I returned the projector to the math closet and got busy deciding which states would be which color. I had bought 5 different colors of pre-mixed paint in quart size containers. Red, yellow, green, grey, and blue. I wrote the name of the color inside each state. Then I grabbed my brush and started painting.


These were both taken after 1 coat of paint. The grey covered much nicer than the red and the green. Probably because the grey was satin and the other colors were semi-gloss. Learn from my mistakes - don't use semi-gloss paint. Oh, and ignore that weird line going down through Montana and Wyoming; there was an adhesive strip that I still needed to remove.


I did the entire first coat by myself. Got a little messy in the process, but that's the fun part! A couple days later my mom came out and helped me paint the remaining coats on the map. It was nice to have an extra set of hands because we could tackle two colors at once.

The finished product:


Some other things that should be mentioned:

  • I used a black sharpie marker to draw the dashed lines around Alaska and Hawaii
  • You can still see the pencil outlines around the yellow states if you look hard enough.
  • You can still see the word "yellow" in the yellow states if you look hard enough.
  • I really shouldn't have painted Michigan blue; some students think it is the lakes and not the state itself. I have to remind them that there are five Great Lakes, not two. (And, yes, I teach high school juniors....)
As you saw in my most recent classroom tour, all of the walls got a fresh coat of paint, including the white around the map. I also added a border around the map to give it a more finished look.


Overall, I'm in love with my map! And the students love it too. It really has been helpful in getting the kids to understand where things in history are happening and not just the what and the who.

Saturday, February 15, 2014

It's Been A While

Life has been pretty crazy lately. Let's catch up....

The month of January was pretty hectic. There was rarely a night that I didn't have anything planned.


Suddenly I went from having 1 class of AP students to 4 classes of AP students. So a lot of my afternoons have been filled with teenagers staying after school in my classroom for various reasons. Besides that, I agreed to be the ticket-taker at both the girls and boys basketball games this year. At times that meant 4 games a week. As much as it was a huge time commitment, I'm excited to earn a little extra cash to put towards a down payment on a house

When I wasn't collecting ticket money at the school basketball games, I was holding Powderpuff practices with my Juniors. I never played when I was in high school, and had yet to attend a game since I started teaching, so it was all new to me. I wasn't suppose to be at the Powderpuff game - it was originally scheduled while I was away at an AP conference in Jacksonville. But it was rescheduled due to weather, so I got to watch. In the end, I'm glad I was able to go because we ended up winning!


After the Powderpuff game I had to rush home and pack my bags. Dan's grandmother passed away and we had to make the trip up to Connecticut for services. It was my first time to Connecticut, and Dan's first time back since he was 2 years old. It was also our first real road trip. We left the next morning and drove straight through. It was a great trip, despite the circumstances. I'll share more later, but for now, here's a couple of pics from the trip.


We just got back into town last weekend. Things are finally settling down. Now it's just a matter of catching up on all the grading that was piling up on my desk while I was away.

While we were gone, my mom looked after our cats. We're still waiting on our little fur babies to quit growling and hissing at each other and become friends...


It's definitely been an adjustment since we added Callie to the mix. We're hoping that in the next couple months they'll have worked through all of their issues. Fingers crossed!

We've been experimenting with some recipes I found on Pinterest. Some were good (like this and this). Some not so good (like this one). You know how that goes!


And since last night was Valentine's day, I guess I should probably share a little about our Valentine's. Since Dan had to work last night, he made reservations for Thursday night at a local spot. When we came home there were tulips, a card, and wine waiting for me. He went all out this year! I gave him his gift last night - a card and some Reese's cups with stickers on them that had things I love about him or inside jokes written on them (idea from here). All in all, it was a perfect Valentine's!


Oh, and I can't forget the little gift a student brought me earlier this week! Her church was holding a "Love Week" where they pick one person each day and shower them with love. This student decided to shower her teachers with love in the form of chocolate chip cookies and Expo markers. What teacher wouldn't love sugar & markers?


So that's pretty much what's been going on around here lately. Although things are winding down, our schedules are never quite clear. Besides school and family life, we've now added trying to buy a home to our list of things to do. There's already been a few bumps in the road, and I'm sure there will be more along the way. One of these days I'll get around to writing about it. But, right now, I've got a pile of papers calling my name that I've been neglecting.

Monday, January 6, 2014

Reese's Peanut Butter Cookies

I'm not one who normally watches the Food Network, but I've fallen in love with this show called The Pioneer Woman. Maybe you've heard of it? Or maybe you've read her blog? Anyways, what I love about her recipes are that they require common ingredients, are simple to follow, and are really tasty!

The other day I was watching her show and she made these tiny little peanut butter cookies with Reese cups plopped on top of them. I knew my chocolate and peanut butter loving husband would drool over them. The only problem? I didn't own a mini muffin pan which was required for the cookies. Then, miraculously, I was gifted two pans for Christmas. (Hmm.... I wonder if the gifter had an ulterior  motive?) And since the recipe only required 2 ingredients, it was easy to add them to our shopping list and wouldn't break the bank - especially when I picked up the chocolates in the 50% off Christmas section.

I'm not going to go into how to make the cookies (you can head over to Ree's blog for the recipe), but I still wanted to share photos of making them.


That's a lot of wrappers!


The photos were taken when I made the second batch. I think the first batch turned out much better, although I'm not sure what I did different. The second batch didn't come out as soft as the first - maybe I left them in too long? I may have cut the slices too thin too, which effects the puffiness of the cookies. 

Softness and puffiness aside, they were still delicious! We made this batch to take to our friends house to watch the Fiesta Bowl (Go Knights!!) and made an extra batch to leave with them for a certain someone's birthday (my friend's husband is as much a peanut butter and chocolate lover as my husband!). It was a big hit! Definitely think this is going to become a go-to recipe.


Have you tried any new recipes out lately? Did you find them through Pinterest (where I typically find mine) or on TV? I love finding new recipes to test out!

Monday, October 14, 2013

Desktop Dry Erase Board

Last month I entered a giveaway at one of my favorite blogs, Two Twenty One. And to my surprise, I won! We won't talk about the fact that I had my mobile network turned off on my cell phone which prevented me from getting email notifications and almost caused me to miss out on some awesome goodies...

So what exactly did I win?


A bunch of tape! But not your run-of-the-mill, plain, boring tape. Nope. This tape came with all sorts of awesome designs!

I started brainstorming what my first project would be. Of course I hit up Pinterest for some inspiration,  and found some amazing ideas like this, this, and this. But, ultimately, I decided to try my hand at creating the very project that was the inspiration for the giveaway - a picture frame turned dry erase board. I found an old 5x7 frame in our junk closet and got started.

Chelsea has a great how-to on her blog, so I'm not going to go into much detail. The only difference between what she did and what I ended up doing was that she applied the tape directly to the glass. I chose to apply the tape to the photo insert of some random family that always comes with frames. Since the tape was thin, I chose to tape the white side of the paper.

The finished product:


I started to write a to-do list to see what it would look like. But, since the Hubby and I both share this desk, having a to-do list for just one of us seemed silly. So, I decided to erase it and write a little message instead:


Dan and I are constantly surprising each other with dry erase messages on our bathroom mirror. I think it will be fun to have another place to write surprise notes and see how long it takes him to notice... :)

Overall, it was a pretty straightforward project. The only struggle I had was lining up the tape to match perfectly. To be honest, if you look close enough, you might see some gaps between the tape. Oh well. For a 5 minute project, I'm not going to complain. It instantly added a pop of color to our otherwise dark desk.

I can't wait to use these rolls of bright & patterned tape on another project. I'm thinking maybe something like this? If only I had another good frame lying around...

A big thank you to Chelsea for hosting this awesome giveaway and for the desktop inspiration!

Tuesday, July 30, 2013

Simple Paint Storage

I wanted to share a quick and easy storage solution for any leftover paint you might have lying around your place. 

After the paint crew finished painting my classroom, I was left with two messy looking gallon containers. I didn't feel like leaving them in my classroom storage closet, so I brought them home with me. The only problem is that we have pretty much run out of storage space in our apartment, so finding room for two gallons of paint plus all the supplies we had purchased was proving difficult. Not to mention, it seemed silly to keep such large containers when the majority of the paint was gone. 


So, I turned to Google and Pinterest for ideas on how to store paint.  My favorites were these two:


I loved the first because it was simple and streamlined. Plus, it seemed like something Dan would approve of. The second option was my favorite in terms of style - mason jars & pretty color labels. And, the jars would be easier to use for quick touch ups.

The Hubby and I went out shopping to price both options. We found quart sized empty paint cans at our local Lowe's for $2.97 a piece. Although the price was right, I was still holding out for cute mason jars. So, off to Wal-Mart we went. After searching all over, we finally found the canning supply section. For under $10, we could get 12 quart sized mason jars. Can't beat that price!

But, as Dan reminded me, we didn't need twelve - we only needed two. What were we going to do with the other ten? And where were we going to store the rest of them? Sure, it's cheaper per jar, but it doesn't make much sense to spend more on them if we're not going to use them. Besides, when it comes time to move, do we really need to worry about glass jars full of paint? Grrr... I hate it when he uses logic to talk me back to reality.

So.... back to Lowe's we went and picked up two quart sized empty paint cans. Once we got home, I transferred all of the paint to its new home. I also labeled each can so that if we ever needed more of the paint, we'd know what to buy.


The labels were $2 from Wal-Mart. I could have made labels nicer/cuter using the computer, but I didn't feel like fiddling with the printer and getting the settings just right. I wrote down the information from the paint swatch as well as the base paint that was used; we've never had to buy more of the same color before, so we were sure what information would prove useful. Oh, and in case you're wondering, I just used my finger to make the little paint dots on each of the labels. Others recommended using a q-tip, but I didn't mind getting a little paint on me.

So, that was our quick and easy solution to storing our paint. Now, the cans fit nicely inside of a copy paper box with all of the other quart size cans we've collected (chalkboard paint, primer, etc.).

How do you store your leftover paint? Do you transfer them all into smaller containers or leave them in the originals?

Thursday, May 16, 2013

Testing Encouragement

Yesterday my AP students took their national exam. The poor things had to wake up crazy early (compared to their "normal") and be at school 2 hours before the rest of their peers. I made sure that they all had something to eat before their test - donut holes, bananas, granola bars. Nothing special, but at least I knew they all has something in their stomachs. Along with the small breakfast snacks, I bought each of them water so they'd have it during their test.

I also wanted to do something cute and encouraging, like the elementary teachers do. Hey, us high school teachers can get crafty and creative too! Granted, I needed the help of Pinterest to come up with something. Originally I thought I would do this, or even this, but decided that it would cost too much to buy enough candy for every kid. Then, I saw that blow pops were pretty cheap. Then this pin popped in my head. Another quick search on Pinterest once I got home, and I came across this water bottle label template.

This is the finished product:


Dan helped with the assembly line process - I taped the strips on the bottles and he added the lollipops. Cruz even got in on the action...


What I failed to think about was how I was going to take 20+ bottles of water downstairs, load them in my car, and take them into the cafeteria the next morning. It's not like I could put them all back in the packaging. Then Dan came up with the idea to load them all into one of our laundry baskets. Cruz thought that was a grand idea...


The kids thought the bottles were fun. Well, the kids who were at least semi-awake when they showed up. The rest of them seem to appreciate it after they were done with the test...around lunch time. They seem cautiously optimistic about their results. But we won't know how well or poor they did until July. Every year I think the worse... and every year I've been surprised. But I'm really not too positive this year. So, fingers crossed my kids did better than last year's group....

LinkWithin

Related Posts Plugin for WordPress, Blogger...