Monday, November 28, 2011

Update & Quiz

Hello all! The hubby & I are recuperating from our honeymoon cruise today. I know, I know... you're probably wondering how much recouping do we really need after a week in paradise. We still have to unpack everything & do a ton of laundry. Also, I'm trying to figure out why sometimes it still feels like I'm walking on a ship when I know I'm on solid land. I'm telling you, if you've never experienced this, it is the weirdest thing ever! As we all know, I'm horrible about predicting when, but I will try to post sometime in the near future pictures from the trip. Transferring them from our camera to our computer is another thing on our to-do list (along with writing a ton of thank you cards!).

Anyhoo, this would be a really boring  post if all I did was tell you I was home and tired, huh? Well, I'm spending some time catching up on some of my favorite blogs today and saw a post from YHL about a design style quiz from Nate Berkus (click here to check out John & Sherry's results). So I thought what the hay, I can take a quick 5 question quiz.

Now, I can't say that I've jumped on the Nate Berkus bandwagon like many of the bloggers I read have. Don't get me wrong, the guy is brilliant in the world of design! And that's probably an understatement of his abilities. But I guess since I don't watch his show all the time (no DVR and work during the day), I'm not as enamored with him as all of his fans are. I'm sure come summer vacation when I'm home everyday and plopped on the couch in front of the t.v. this attitude might change, but for now, I look at his work as more inspiration, much like I look at the inspiration on blogs and magazines.

Getting back the the quiz... Like I said, it's only 5 questions. I was a little skeptical about it since it was such a short quiz. Really, how much can you figure out about my style after 5 questions? But, I must admit, this quiz pretty described how I feel my design personality is to a tee. These were my results:


I find it interesting that my results were identical to Sherry's. Granted, I don't think I could make the same bold color choices that they have made in their home, but I can't deny that I don't love the clean lines, yet comfortable and welcoming feeling of their home.

Honestly, I think if you were to walk into our apartment today and look around, you would not get the modern/vintage impression. It would feel a little more like college dorm room, but taken up a notch. Our place has a lot of mis-matched furniture; pretty much everything is either a hand-me-down or a yard sale/thrift store find. The only pieces I think we've actually purchased are the bed (which I've had since high school & will be replaced in the next couple of weeks - new bed is on order!!), the bed, the bed.... really, that's about it.

Don't get me wrong, I'm pretty grateful to all of our family and friends that have given us stuff to make our place feel more like a home. But now I'm hoping to make it feel more like "us" rather than just other people's stuff. And little design quizzes like this one help me to narrow down my design asthetic so I can make choices a little easier when I'm out browsing and shopping.

If you're interested in taking the quiz and figuring out (or confirming, whatever floats your boat) your design personality, head on over to Nate's site and check it out. I'd love to know what you're results were!

(By the way, Nate Berkus, nor probably the Youngsters, know who I am or about this little blog. I wasn't asked, paid, or perked to take the quiz and blog about it. I simply thought it would be fun to take and share.)


Thursday, November 17, 2011

New Beginnings

So it's official! It's officially over! It's officially done! My name has officially changed! Well... not according to my social security card or drivers license, but you get the picture... We're officially hitched!!

Right now I'm really busy trying to get caught up on grading and lesson planning, but I wanted to stop by and share the good news. And what makes good news better? A couple of pictures!

We'll start off with the boys. That's the hubby (weird not calling him the fiance anymore), the hubby's brother, and two of his childhood friends. I think it's really cool that all of them are Eagle Scouts and have stayed friends for so long.


Once the little boys made it down the aisle the big boys had to help them turn the sign around (inspiration for the sign from here).


Can I just say that there were one too many cameras and cell phones pointed me way as my dad walked me down the aisle!


 I don't remember what was so funny... it was probably when our former youth pastor was poking fun at the hubby for having really sweaty hands.


This one is priceless! I love the expressions on our pastor & matron of honor's faces. My now father-in-law had an air horn hidden in his pocket and when we started kissing the air horn blew! That, and our pastor said something about for every second the kiss lasted, that meant that many years of a happy marriage - and Dan was taking him seriously!


The new Mr. & Mrs. :)


The reception, cake, & getaway car!


All of the pictures were taken by my new mother-in-law. I promise to come back with a post that has some of our professional pictures once they come through. Also, I don't have time now, but I'll come back in a later post with details on our venue, photographer, cake baker, and all the other nitty-gritty details.

Words cannot express how happy we both are to finally be married! It's been 6 years in the making. And now that all the stress of planning is over, we're both really looking forward to kicking off this new chapter in our life with our honeymoon cruise! So please excuse my absence over the next week or two - I'll be sailing in the Caribbean and this blog will be the last thing on my mind!

Tuesday, November 8, 2011

Georgia Wedding #2

This past weekend we made our second trip in just over a month to Middle Georgia to see my cousin Jamie marry his long-time girlfriend Kelly. So I'm back with some photos of the ceremony and some other randomness from our drive.

The first part of the trip was a little rough for me. For whatever reason, I was car sick within the first 30 minutes of being on the road, and it lasted pretty much the entire trip (which was 5 and a half hours if you include our stop for lunch). I don't normally get car sick unless I read a book or something. And the initial plan was to grade papers while driving up there, but obviously that wasn't going to happen. So, let's just say I was not a happy camper. However, these views definitely cheered me up!

My name is Hannah, and yes I like to take photos of my feet. And yes, I know my nails need some serious help.


Man I love fall! I love being able to see the leaves change colors. Sure, in the leaves in Florida change colors - they go from green to dead and fall onto the ground. We totally miss out on all the rich reds, oranges, and yellows. These are the falls I remember from my childhood - spending Thanksgivings in Georgia at my grandparents house and driving up and down that dirt road looking for golf balls (there was a golf course along the beginning of the road). It had been a few years since I got to witness the changing of the seasons. I guess technically I got to see it last year, but my trip to Georgia last year wasn't for the happiest occasions... But we won't get into that now. The point of this post is to celebrate the union of two people who are totally in love.


They had a table underneath the gazebo that had pictures of the bride and grooms grandparents that had passed away. The picture on the left is of my Granny. She passed away almost a year ago.


Their wedding was beautiful! And I'm so happy that Kelly is now officially part of the family. Sorry I don't have more details on the location, but the site doesn't have a web page that I can link to.

So, that's two weddings in just a little over a month. Now I guess its my turn - our wedding is just 5 short days away! I hope to post at least once more before then, but who knows what will happen between now and then. Anyone else have multiple weddings that they had to attend in a short amount of time? What's the farthest you've travelled for a wedding?

Wednesday, November 2, 2011

Fall Pinterest Challenge: Solar Lights (Minus the Solar)


So I'm back with my little DIY project for the "unofficial" Fall Pinterest Challenge, being hosted by these lovely ladies: Katie, Sherry, Ana, and Erin (links to their pages can be found at the end of the post). Welcome to all of those who found this page through their links!

A few days ago I gave you a little big hint as to what I was planning to DIY. Here are a couple of pics to refresh your memory.


Both images from here (via Pinterest)

I fell in love with these things! Basically they take jars and adhere the tops of solar lights to them. Then, you sit them out in the sun to charge up, and when night falls, wa-bam! Instant glow!

I thought these would be great for the wedding. Our reception site has a patio attached to it that we will set up the bar and a couple of tables for people to mingle. And I thought these were perfect for the outdoor setting. Plus, these are definitely something that we can use after the wedding. You know, for our tiny balcony patio that doesn't have a table on it.

Anyhoo, I showed the pics to the fiance and he got on board. Pretty quickly actually. Once he saw he'd be taking apart solar lights, he was sold! So, one weekend when we were visiting our family in Orlando, we made a little side trip to Ikea and picked up 5 glass containers for $3 a pop. And we picked up the frosting spray from Wal-Mart for around $7. That was the easy part...

The difficult part was finding the right size solar light. The inspiration website referenced the perfect sized lights, however, when we went into the stores, everything was way too big. We even tried Wal-Mart thinking they would be the cheap alternative. However, the ones that fit inside perfectly were $4 a pop. And the smaller ones which were $2 cheaper (which would have worked in terms of size) were blue and had white snowflakes on them. Not exactly what I had in mind. So, we opted to skip the solar lights for now.

So once we were home, I got out what I needed to get the job done:
  • the 5 glass containers

  • the frosting spray paint

  • cardboard
  • painters tape
You can find steps & tips for spraying the container from the inspiration site. So rather than simply repeating what has already been shared, I'll share some pictures and my insights/tips along the way.

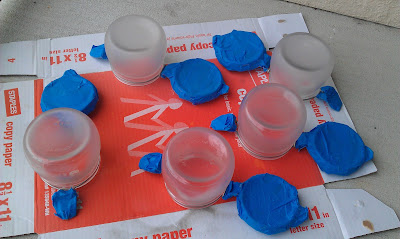
I started by wrapping all of the top of the container (the original plans leave that clear of frost so that the solar panel can get plenty of sunshine). I found that the easiest way to do this was to cut the tape into strips and cover the larger spaces first, then go back in and fill in all the little holes. Oh, and don't worry about covering the metal band going around the top - in the end it doesn't seem as though the frosting spray affected it one way or the other.


Then I took the rest of my supplies outside to start spraying. I've never used frosting spray before, so I wasn't sure how many coats it would take or what it would look like as it dried. I opted to spray the bottoms first since I figured they'd only need 1 thin coat.


At first I was really disappointed. The spray came out in a light mist, but didn't really seem to be "frosting" the glass. But, I figured I'd let the first coat dry and see what happened before applying another coat. And to my surprise, the frosting action started taking place!


At first I only sprayed  because I was afraid I was going to screw something up. But once I realized that everything was working well, I brought out the other 3 and started spraying away. As you can see in the picture, the two closer to the top are the original 2 that I sprayed. You can definitely see the difference a little time makes.


After the first coat dried I flipped them over and did 2 more coats. As I did the last coat, I decided to do a quick and sloppy spray of the insides. It was a tip I saw somewhere that would help with the frosting effect. I think they turned out perfect!


What do you think?? They were so simple. And it took only about an hour (which includes waiting time for the paint to dry). As I mentioned before, we opted to hold off on the solar light component of this project. So, what are we using to light it?


Not sure if you can tell, but its one of those battery-operated flame less candles (which we were gifted by one of the fiance's coworkers)! Sure, it means that we have to open the jars up each time we want to turn them on/off, but we really wanted to have these ready for the wedding and we just weren't finding what we needed. As you can tell, we left the tops clear of frost in case we ever decided to add the solar panels to them. If the fiance has his way, they will get that upgrade!


Total time: 60 minutes
Total cost: $15 (5 jars) + $7 (spray) + $0 (candles) + $0 (tape & cardboard- already on hand) = $22


So, all in all, this was a really simple project. And I am officially a fan of frosting spray! I've been keeping my eyes peeled for uniquely shaped glasses so I can spray them and turn them into candle holders.

Another big thanks to the lovely ladies who hosted this amazing challenge! It definitely gave me the little push I needed to get off the computer and actually stretch my DIY


You can check out their lovely projects (in order of their pictures above) here to see Katie's antiqued window, here to see the plethora of ornaments Sherry created, here to see the lovely bookshelf Ana created for her daughter, & here to see Erin's experience with paper mache and gold lining.

I would love to know what the rest of you guys out in the blogging world created! Leave me a comment to your post, and I'll be sure to check it out! Did anyone else out there spy these little solar light beauties? Did you stray from the directions, or stay on the straight and narrow?

LinkWithin

Related Posts Plugin for WordPress, Blogger...